


Running a business or selling online in India? Then you have probably heard about GST registration and wondered if you need to register. Whether you are just starting out or you have been putting off this important step, getting your GST registration process sorted is crucial for staying on the right side of the law and business growth.
Let’s walk thoroughly through everything you need to know about the registration process without any confusion.
What is GST Registration?
At its core, GST registration is the legal procedure by which a business obtains a unique GSTIN or an official ID card from the tax authorities. After completing the registration, you will get your GST Identification Number (GSTIN), and it will help you conduct business legally, claim tax benefits, and build credibility with customers and suppliers.
We'll walk you through everything: who needs to register, how to register GST online step-by-step, what documents you'll need, and how the GST return filing process works once you're registered.
Ready to get your new GST registration sorted? Let's make it happen.
Eligibility Criteria for GST Registration
Not every business needs to go through the online GST registration process. Whether you need it depends on how much you earn and what kind of business you run.
When GST Registration is Mandatory
Turnover Threshold
Goods businesses: Register if their annual turnover crosses Rs. 40 lakhs (Rs. 20 lakhs in special category states).
Service businesses: Register if it crosses Rs. 20 lakhs annually (Rs. 10 lakhs in special category states).
Other Situations Where Registration is Required
Selling across states: If you supply goods to different states, you need GST registration regardless of your turnover.
E-commerce sellers: Anyone doing GST registration for online selling through platforms like Amazon or Flipkart must register, no matter their sales volume.
Casual or non-resident businesses: If you're temporarily doing business without a permanent setup.
Reverse charge cases: When you're responsible for paying tax on behalf of your supplier.
Input service distributors and agents: If you distribute tax credits or work as someone's agent.
Voluntary Registration
Even if your business doesn't meet the mandatory requirements, you can still choose to register. This helps you:
Claim Input Tax Credit (ITC) on your purchases
Look more credible to customers and suppliers
Prepare for future growth when registration becomes mandatory
The key is understanding where your business stands and planning accordingly.
Different Types of GST Return Forms
Once registered, businesses are required to file various GST returns periodically. These forms ensure that the government receives accurate information on your transactions and tax liabilities. Here’s a breakdown of the key GST return forms:
Step-by-Step Guide: How to Register GST Online?
Getting your GST registration doesn't have to be complicated. The online GST registration procedure is actually pretty straightforward once you know what to do. Here's how to get it done quickly.
Have these ready with you before starting the process: your PAN card, Aadhaar, business address proof, bank details, and a cancelled cheque. This saves time later.
The GST Registration Procedure
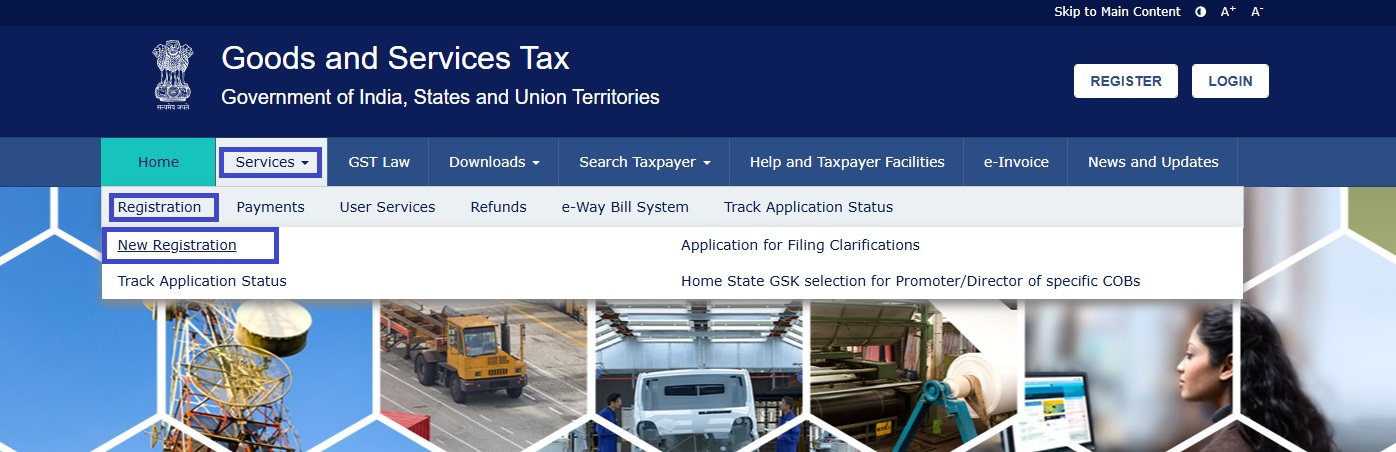
Step 1: Get Started
Visit www.gst.gov.in and click Services > Registration > New Registration. Choose 'Taxpayer' and select your state and district.
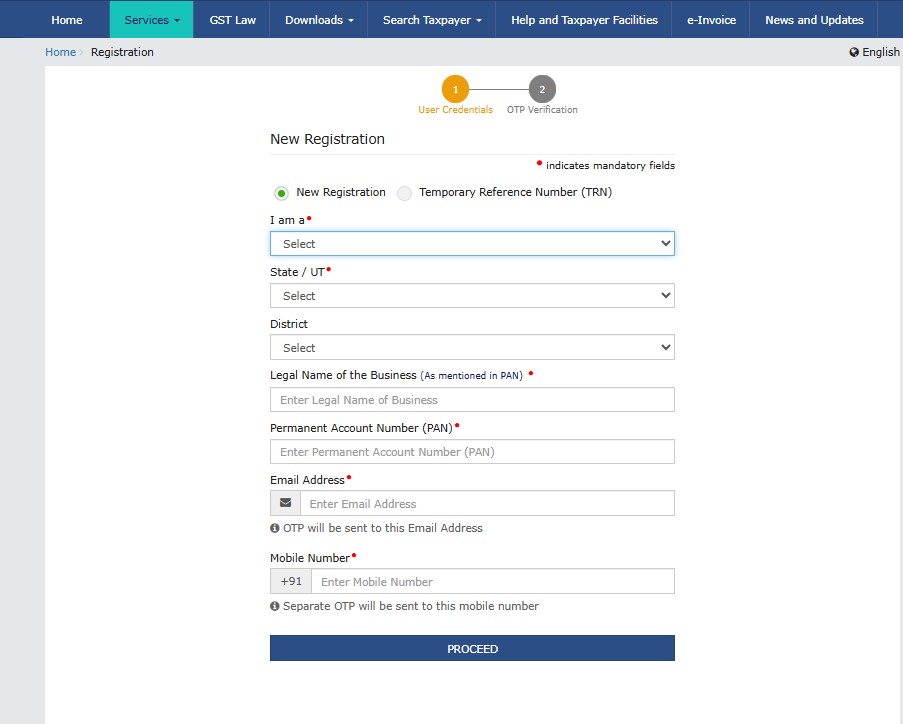
Step 2: Basic Details (Part A)
Enter your business name, PAN, email, and mobile number. You'll get OTPs to verify both your email and phone. Once verified, you'll receive a TRN (Temporary Reference Number) – save this.
Step 3: Complete Your Application (Part B)
Log back in using your TRN. Now you'll fill in the detailed information:
- Business Details: Trade name, what you do, when you started, and your business type (sole proprietorship, partnership, company, GST registration, etc.).
- People Details: Information about partners, directors, or promoters – their PAN, Aadhaar, and photos.
- Authorized Person: Who can sign documents for your business (with proof of authorization).
- Address Details: Your main business location, with supporting documents like electricity bills.
- What You Sell: List your top 5 products or services with their HSN/SAC codes.
- Bank Details: At least one business bank account with a cancelled cheque.
Step 4: Submit and Wait
Double-check everything, then submit using your digital signature or Aadhaar OTP. You'll get an ARN (Application Reference Number) to track your application status.


.jpg)


